

SPACE PHOTOGRAPHY
Why are there no stars in space photos? Exposure, dynamic range and the Artemis II camera data
The stars are there. A camera is set for the brightest thing in the frame, and one frame cannot hold the sunlit Moon and the faint sky at once. Here is the physics, with real numbers from NASA's Artemis II image data.
After the Artemis II crew flew around the Moon in April 2026, the same question filled social media again: if space is full of stars, why are the photos black? It is an old question. Since Apollo, the empty sky has been offered as "proof" that Moon photos were faked.
The real answer is photography, and you can check it with numbers. NASA publishes the camera settings (EXIF data) of the Artemis II images, so we can compare the exposure of a sunlit Moon photo with that of a Milky Way photo taken by the same crew. This guide is for students who want to understand what a camera records and why.
1. A camera is set for the brightest subject
Every frame has one exposure, set by three controls: shutter time (how long light is collected), aperture (how wide the lens opening is, written as an f-number) and ISO (how strongly the signal is amplified). Doubling the light that reaches the sensor is one stop; we will call it one doubling.
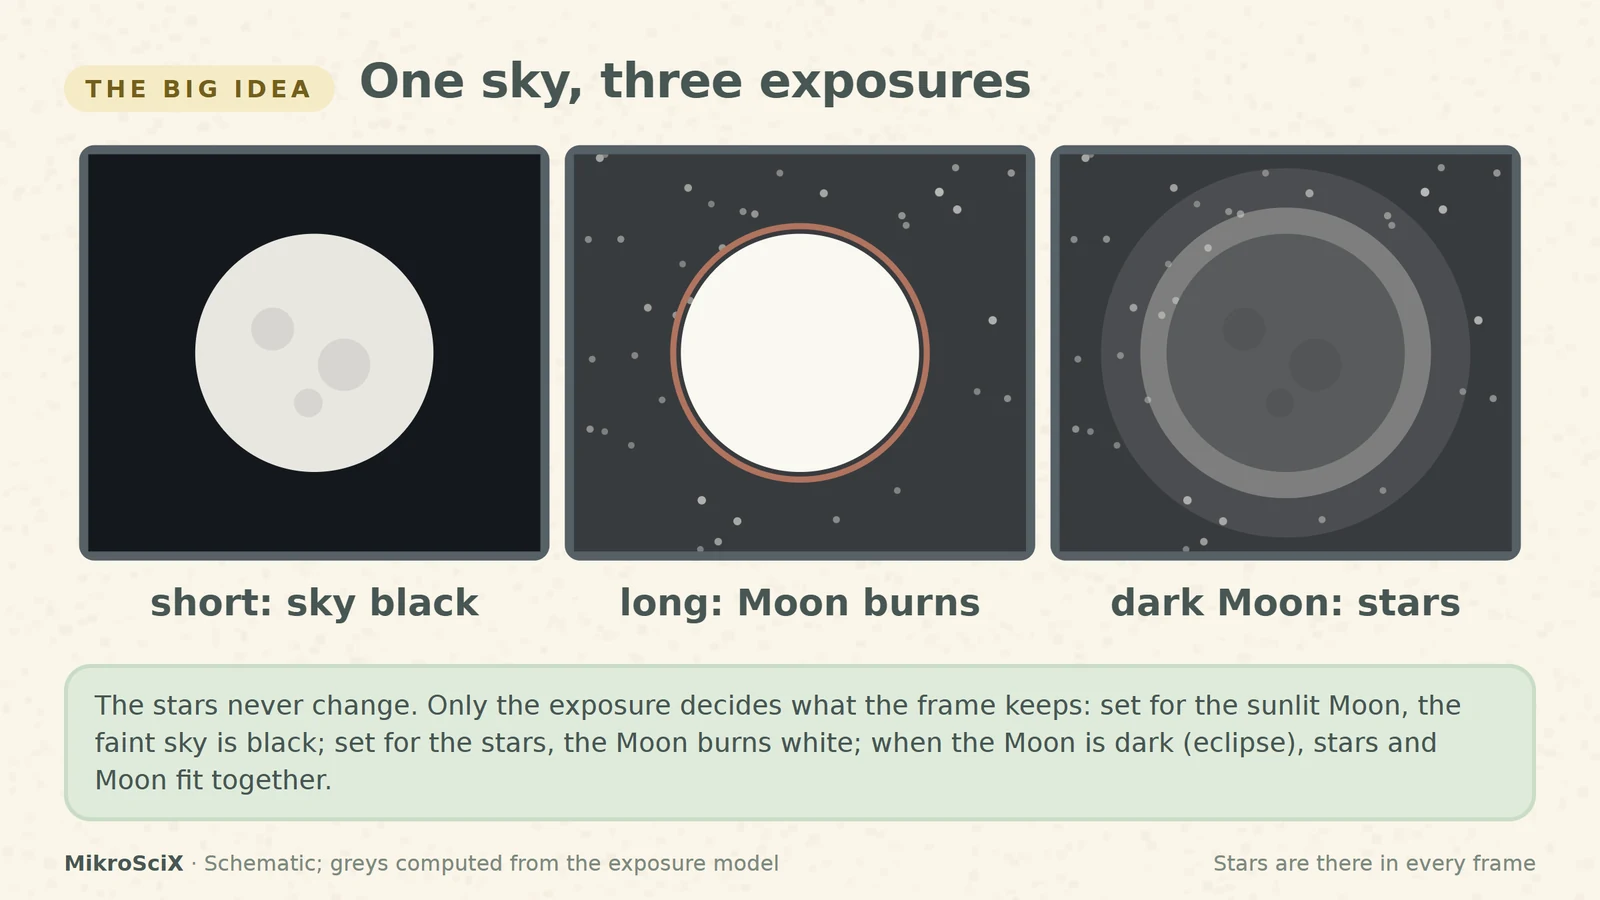
In space the brightest subjects are lit by unfiltered sunlight: the lunar surface, Earth's clouds, white spacesuits, the spacecraft. To keep them from turning into white blobs, the photographer uses a short shutter time and a small aperture. StarDate, the outreach programme of the University of Texas McDonald Observatory, puts it simply: the stars aren't visible because they are too faint for those settings. The Planetary Society's explanation of Apollo photos is the same: they were exposed for the sunlit surface and the white suits, far too briefly to record stars.
What breaks:
- Very bright points. Bright planets and the brightest stars can still show up in some frames; Venus appears in Artemis II images, for example.
- Cameras with fixed settings. Many space cameras have a fixed aperture designed for one kind of target, so they can be overwhelmed by a much brighter one.
2. Count the doublings: 21 between the Moon and the Milky Way
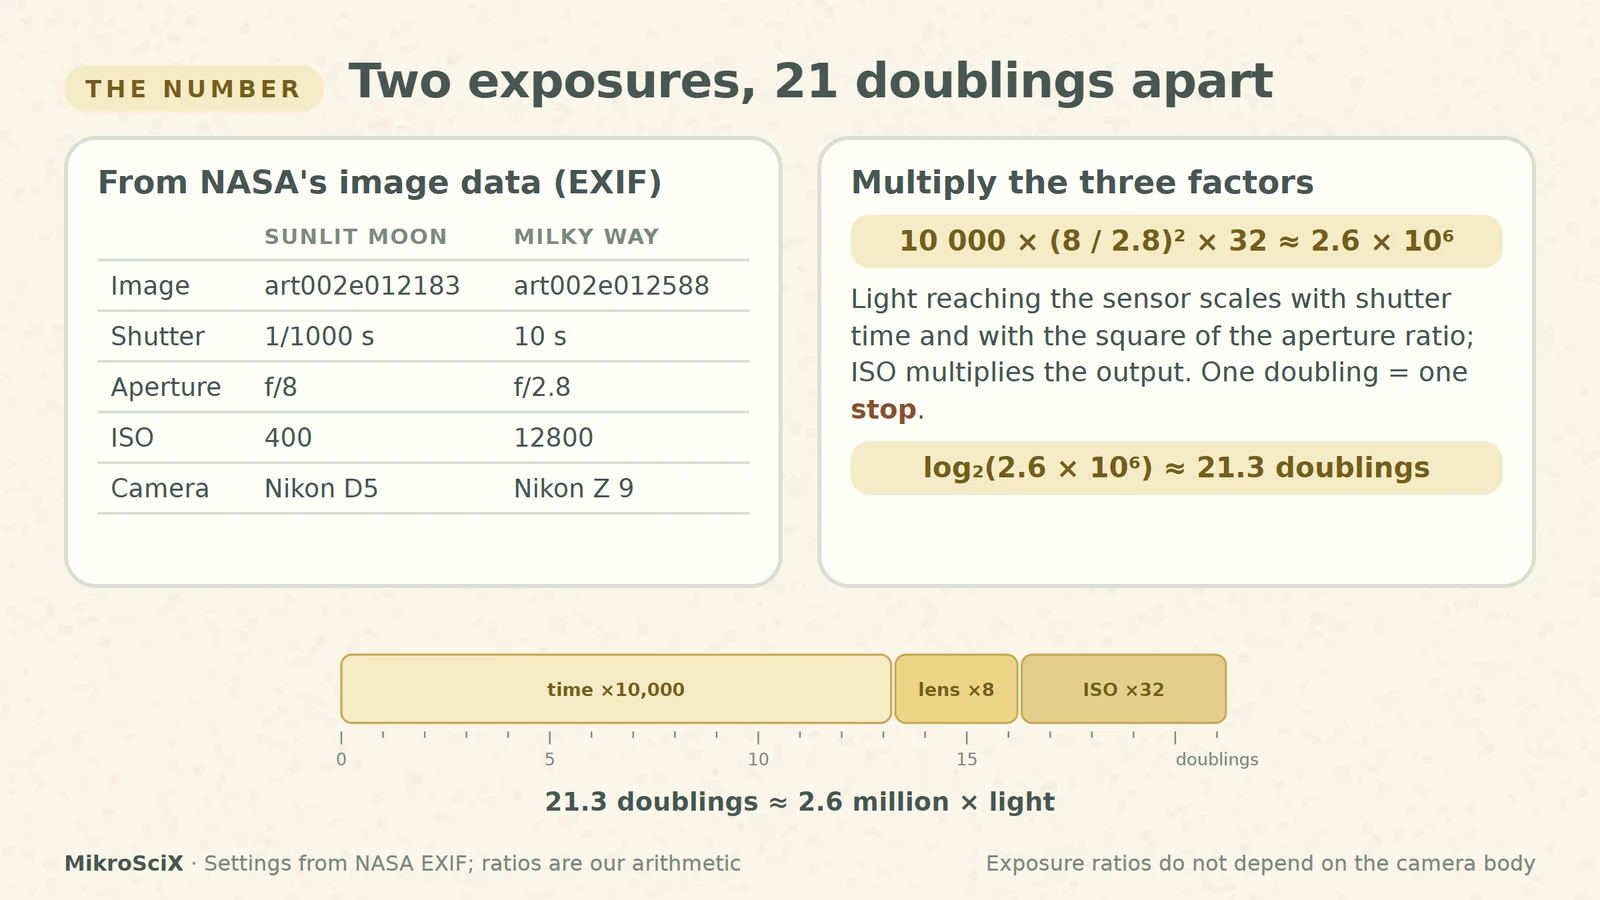
On the 6 April 2026 flyby, the crew photographed the sunlit Moon (NASA image art002e012183) at 1/1000 s, f/8, ISO 400. The next day they photographed the Milky Way (art002e012588, "Starstruck") at 10 s, f/2.8, ISO 12800.
Check it yourself. Light collected grows with shutter time, with the square of the aperture ratio, and ISO multiplies the output:
- Time: 10 / 0.001 = 10,000
- Aperture: (8 / 2.8)² ≈ 8.2
- ISO: 12800 / 400 = 32
Multiplied: about 2.6 million times more light for the Milky Way. In doublings: log₂(2.6 × 10⁶) ≈ 21.3. The crew had to double the light about twenty-one times to turn the faint sky into a good picture.
The two photos were taken with different Nikon bodies (a D5 and a Z 9), but exposure ratios do not depend on the body: they describe how much light the settings let in.
3. Each pixel is a bucket with a limited ruler
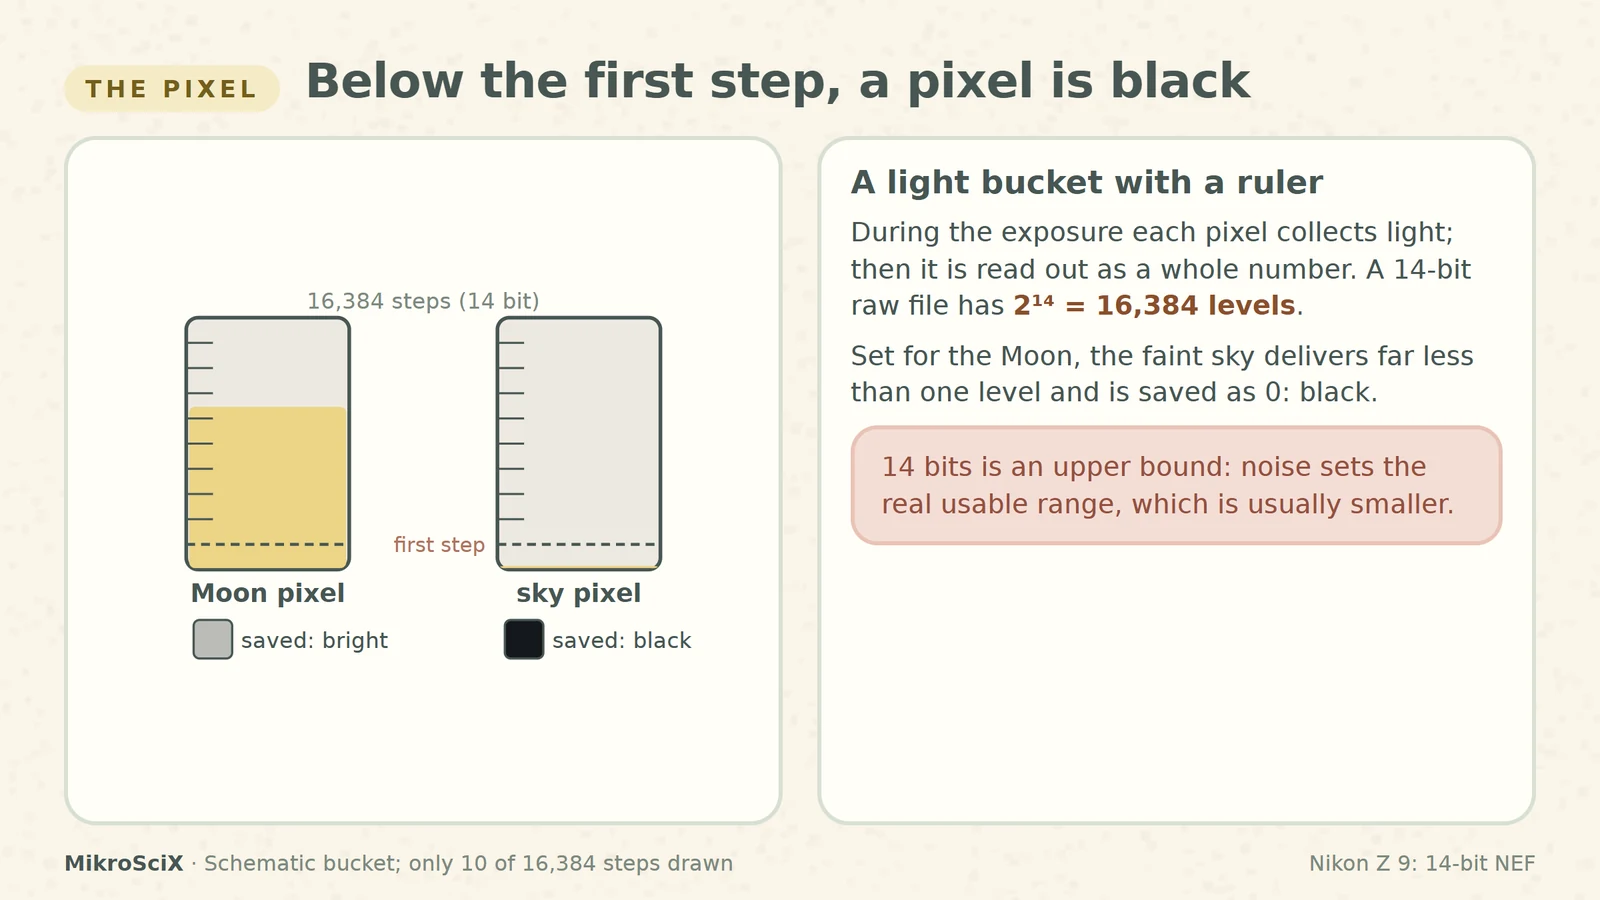
During the exposure, each pixel collects light. Then the camera reads it out as a whole number. A 14-bit raw file, which the Nikon Z 9 records, can store 2¹⁴ = 16,384 levels. In a linear raw file each extra bit doubles the number of levels, so one frame can hold at most 14 doublings between its faintest and brightest recorded value.
Now put the two facts together. If the exposure is set so the sunlit Moon sits near the top of the ruler, a sky 21 doublings fainter gets far less than one level. As an illustration: if the Moon filled the top level, the sky would deliver about 2.6 × 10⁶ / 16,384 ≈ 1/160 of the first step. It is saved as zero, black.
What breaks:
- 14 bits is an upper bound. Noise in the sensor and electronics decides the usable dynamic range, and it is usually smaller than the bit depth.
- Space cameras differ. The Planetary Society notes that many scientific space cameras have more dynamic range than consumer cameras; their dark parts often contain detail that a normal display hides.
4. The same thing happens on Earth
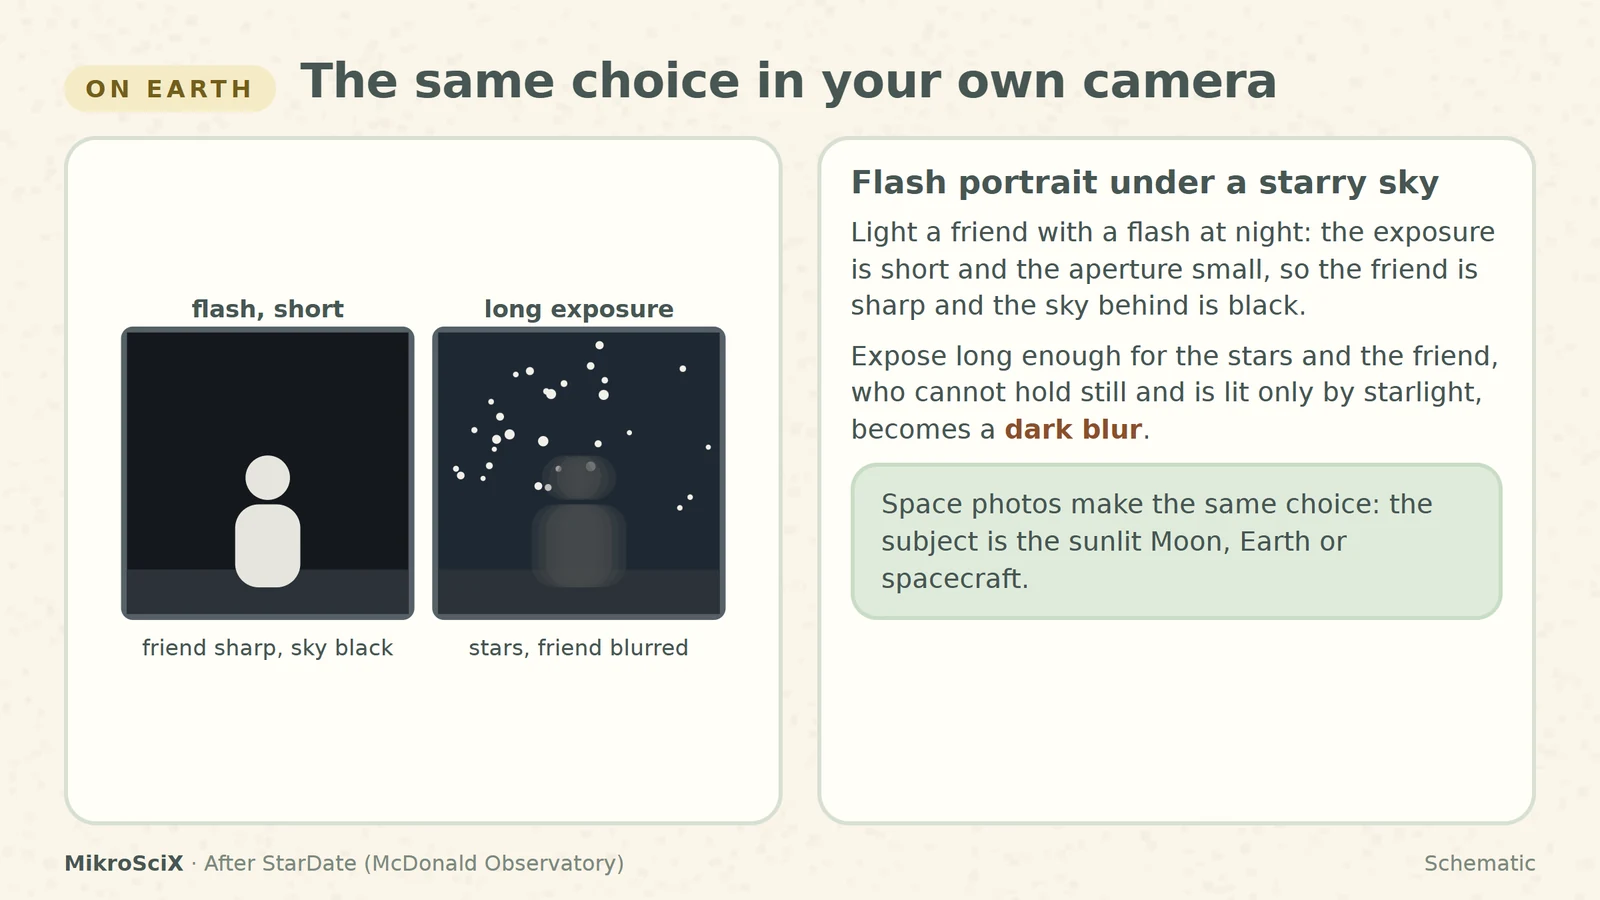
StarDate's example: photograph a friend at night under a starry sky with a flash. The flash lights your friend for a fraction of a second, the exposure is short, and the sky behind comes out black. To see the stars you would need a long exposure and a wide-open aperture, and your friend would come out dark and blurry.
Space photos make the same choice, only more extreme: the "friend" is lit by full sunlight, and the stars are just as faint as they are from a dark field on Earth.
5. Expose longer, and the Moon burns
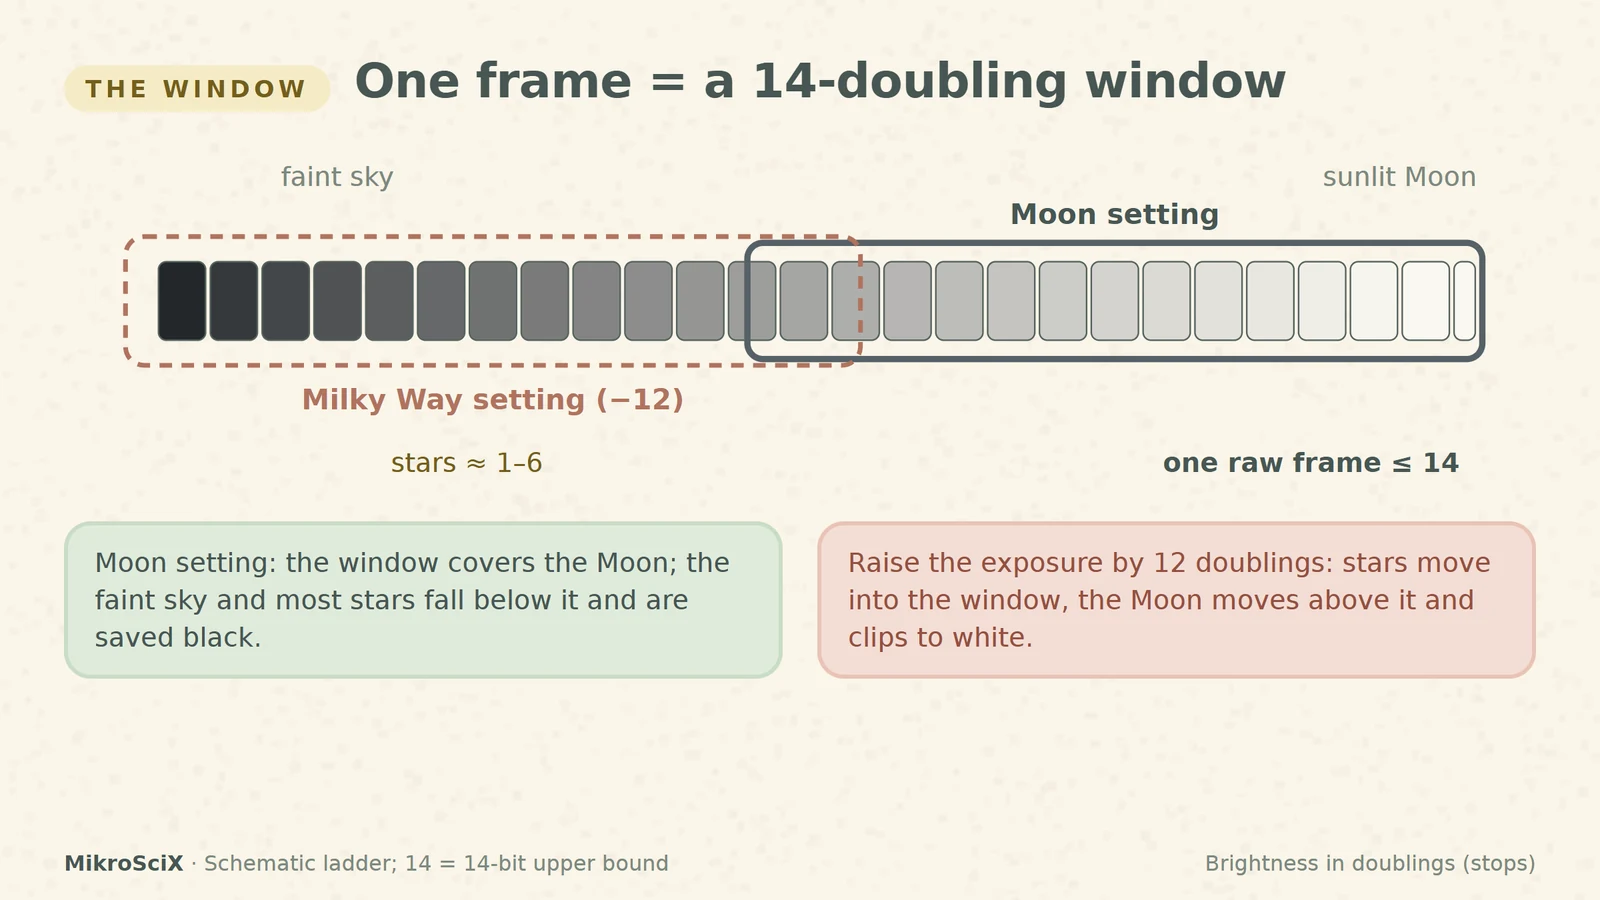
Think of brightness as a ladder of doublings, with the faint sky at the bottom and the sunlit Moon at the top. One frame is a window about 14 rungs tall (less, in practice). Set the window on the Moon and the stars fall below it. Slide it down by a dozen doublings and the stars move into the window, but the Moon moves above it and clips to pure white.
The best evidence comes from Artemis II itself. When the Moon passed in front of the Sun during the flyby, the crew saw nearly 54 minutes of totality. With the Moon dark, they photographed it at 2 s, f/2, ISO 1600 (art002e009301). NASA's caption notes that stars, "typically too faint to see when imaging the Moon", are visible.
Check it yourself. Compared with the sunlit Moon frame: 2 / 0.001 = 2000, (8 / 2)² = 16, 1600 / 400 = 4. Product 128,000 ≈ 2¹⁷: about 17 doublings more light. That only works because the bright subject was gone.
6. The pitfall: "no stars means fake"
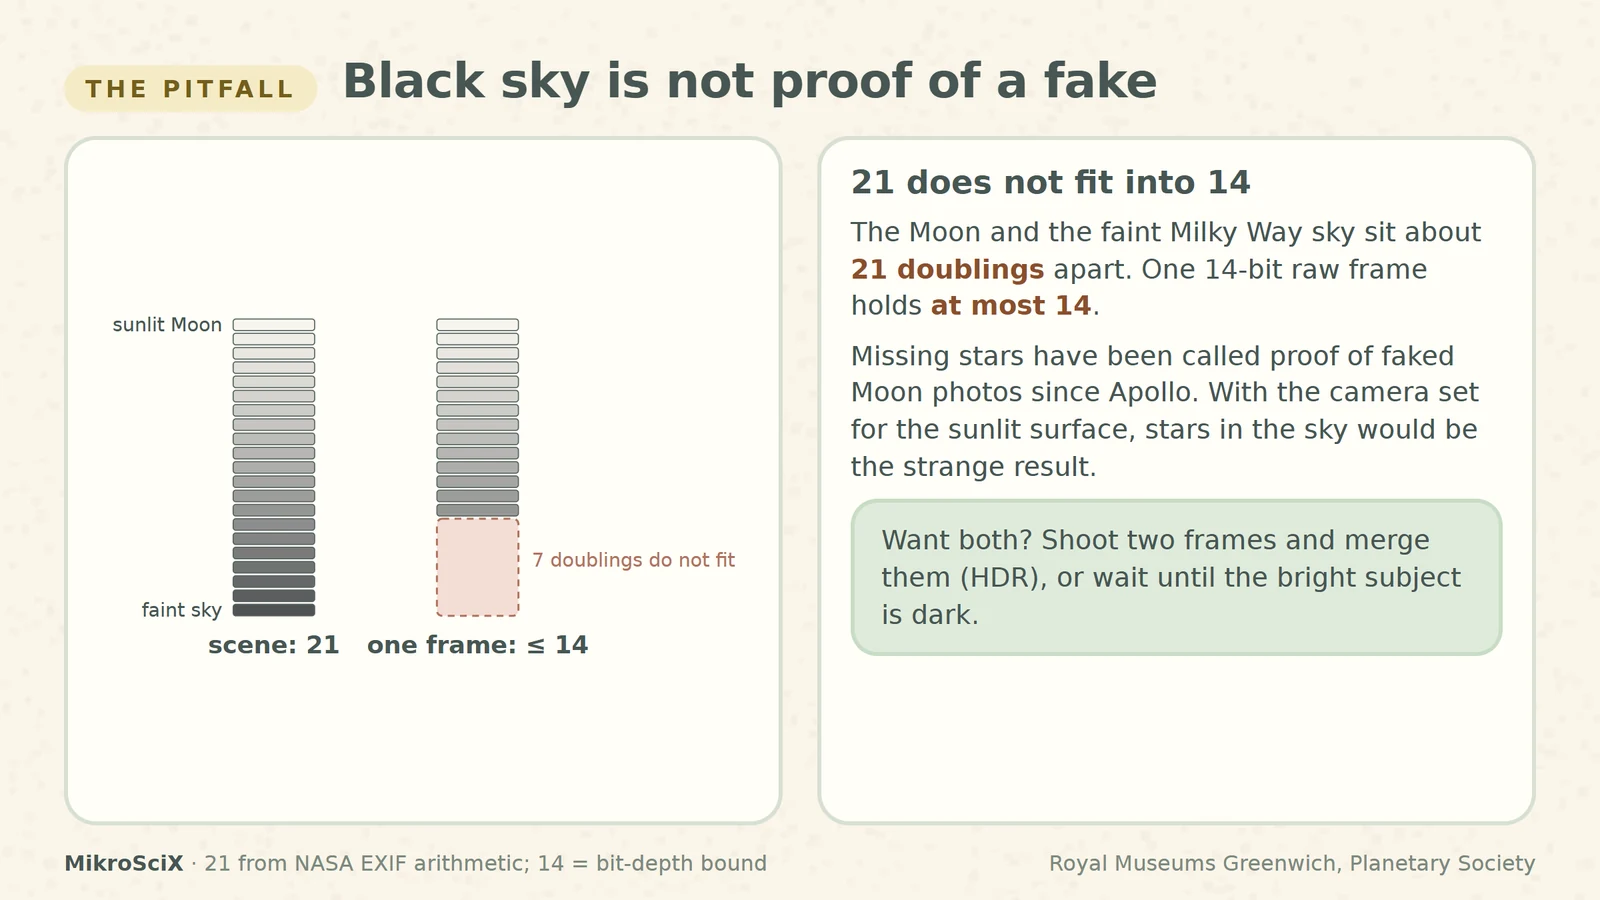
Royal Museums Greenwich lists missing stars among the classic Moon-hoax claims and gives the same answer: in a brightly lit scene the shutter speed must be fast and the aperture small, so faint objects like stars simply don't show up.
Turn the argument around. The sunlit Moon and the faint sky are about 21 doublings apart; one raw frame holds at most 14. A Moon photo with a sky full of stars at 1/1000 s would be the suspicious picture.
How to photograph stars yourself
- Keep bright things out of the frame (street lights, the Moon) or let them burn.
- Use a long exposure, a wide aperture and a high ISO: the Artemis II Milky Way frame used 10 s, f/2.8, ISO 12800.
- Want both a bright subject and stars? Take two exposures and merge them (HDR), and say so in the caption.
The stars are there. A photo shows what fits in one exposure window, and the sunlit Moon and the faint sky do not fit in the same one.
Try it yourself
- A photo at 1/250 s, f/8, ISO 100 is compared with one at 15 s, f/2.8, ISO 3200. How many doublings apart are they?
- How many levels does a 12-bit raw file have, and at most how many doublings can it hold?
- Why could the Artemis II crew image stars around the Moon during the eclipse but not during the sunlit flyby?
Answers: (1) 3750 × 8.2 × 32 ≈ 9.8 × 10⁵, about 20 doublings. (2) 2¹² = 4,096 levels, at most 12 doublings. (3) The Moon was dark, so the exposure could be raised about 17 doublings without clipping a bright subject.
Watch the short
Videos don’t load automatically. The videos are hosted on YouTube. Allow YouTube once and every video on the site loads by itself; your choice is remembered. The articles never need consent.
Sources
- NASA — Artemis II in Eclipse (art002e009301)
- NASA Image and Video Library — art002e012588 “Starstruck”, image metadata (EXIF)
- NASA Image and Video Library — art002e012183 “Capture My Good Side – The Moon”, image metadata (EXIF)
- NASA Image and Video Library — art002e009301, image metadata (EXIF)
- StarDate, McDonald Observatory (UT Austin) — Why can't we see stars in the pictures of spacewalking or moonwalking astronauts?
- The Planetary Society (E. Lakdawalla, 2019) — Why are there no stars in most space images?
- Royal Museums Greenwich — Moon landing conspiracy theories, debunked
- Nikon — Z 9 Online Manual, Specifications (14-bit NEF)
- IFLScience (A. Carpineti, 8 April 2026) — Yes, you can see stars and planets in the Artemis II photos
Camera settings are from NASA's published EXIF data; exposure ratios and doublings are our own arithmetic. Diagrams are schematic; the “1/160 of a step” example is illustrative.